Last minute Christmas Gift wrapping
Hi All!
IT IS ALMOST
CHRISTMAS! I hope you all have finished your Christmas shopping, creating,
decorating, crafting, baking and anything else that could fit in that list! For
us Christmas is already happening. Seeing some people here and there and on
this day and that day. Gifts here, laughter and fun over there.
For those of
you who are pumping out the last few things, in these last few moments or the
last day. Here’s some last-minute gift-wrapping tricks and ideas I’ve got.
Hopefully throughout
the year you may have collected some cereal boxes. These are great for other
crafts too – and not just with kids! (New year’s resolution idea maybe? Keep cereal
boxes for future craft and gift-wrapping ideas!) I remove the tabs off the top
of the cereal box so there is an opening, then wrap the box up with Christmas Paper.
Next for a finishing touch using washi tape around the edges of the opening. Then
using a hole puncher, press two holes for each side where you can use a matching
ribbon (two pieces needed) to tie knots into the end when fed through the
holes. These will become the handles. Ideally you wouldn’t want to put anything
‘too’ heavy into this gift box, but it provides a nice way to present a gift.
Next a tag
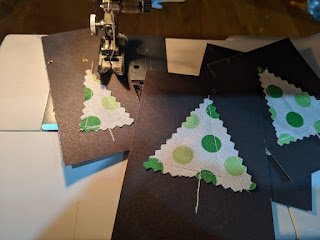
idea! Use a piece of cardboard of choice – I tried to pick something that was plain
but still had an element of Christmas appeal. Then using scraps of Christmas themed
fabric and pinking shears cut out triangles. Ideally isosceles triangles (the
one with short base and long sides meeting at a point – like the Christmas tree
shape).
Then using a sewing
machine sew around the triangle starting at the tip, travel down one side of
the triangle, joining to the base where you need to sew half way through then
come down to make a short length for a trunk, then reverse stitch back to the
base and continue sewing the fabric piece onto the cardboard.
For the reverse
side I used one of my graphic markers with the broad tip to write the To and
From information.
I also wanted
to but didn’t get the chance myself this year to make a short garland of oven-dried
orange peel cut into small shapes and threaded through using twine. Then
include on it a couple of cinnamon bark quills. This would have been an ideal
Christmas smelling garland for the receiver to hang in their home for the
future Christmases. Sure I didn’t get that one done this year, but there is
next year!
Speaking of garlands however, I was quickly able to put two together during December! One is a Christmas Tree Garland. If you wish to make a replica all I did was cut out triangles from pieces of green Christmas looking fabric, with pinking shears (makes for lighter work in the long run). Then sew the pieces together in two parts. That is sew making sure right sides of fabric are outward - as in how you wish to view the pieces. Then sew a small triangle to keep the tips together and partial edge. Next leave a 1cm gap, then sew the rest of the tree together in the shape of a trapezium. Oh! You will also need brown fabric for the trunks. Just cut out a long strip which you can fold in half and sew that into the base section of the triangle when you are sewing. Then with all the trees sewn just thread some string through the 1cm gap bit and DONE!
Another garland I was quickly able to put together can be referred to my Happy Birthday Bunting I created earlier in the year. However instead of saying "Happy Birthday" make this one say "Merry Christmas" in matching Christmas colours to the theme within your home.
(Finnish version of Merry Christmas for my bunting)
I hope these
ideas have given you some inspiration and ultimately I hope you all have a
blessed and wonderful time this Christmas, and across the whole holiday season.
Bye for now,
Love Lenita.


Comments
Post a Comment