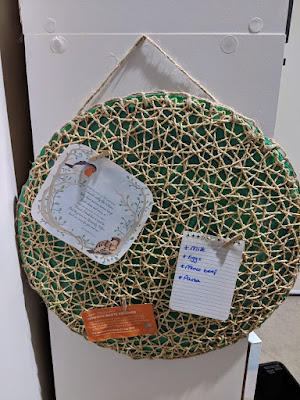
Place-mat Noticeboard
I needed a larger noticeboard and got thinking how these
materials could work toward something beneficial. Firstly, the cardboard needed
to match the size of the circular placemat, so that was painstakingly
established. Then some colour needed to be incorporated and to match my already
coastal orientated theme around the house I used teal, navy and white. To make
things more interesting I decided to squirt the paint randomly all over the
cardboard. Then to paint it I would just use one stroke in the circular
direction, starting outside and working in to create a mixed colour board. Then
set to dry.

 Once dried I put my placemat over the top and using twine, I
threaded into a large sewing needle (like one you may use for mending woolen
projects) utilising the buttonhole stitch method (or blanket stitch, which ever
you know it by) around the edges to seal the placemat together to the
cardboard. When coming back to the original stitch I tied it up and knotted
several times to ensure it all stays together.
Then I worked a new knot into the stitch before and ensured the twine was double thickness with a gap of 9 stitches leave some slack in the string as this will be what you use to hang the noticeboard by. Tie off on the 9th stitch.
Ta-da new exciting wall space as decoration and practical for noticeboard things. Good to keep near a kitchen or entrance to grab that shopping list off!

 Once dried I put my placemat over the top and using twine, I
threaded into a large sewing needle (like one you may use for mending woolen
projects) utilising the buttonhole stitch method (or blanket stitch, which ever
you know it by) around the edges to seal the placemat together to the
cardboard. When coming back to the original stitch I tied it up and knotted
several times to ensure it all stays together.
Once dried I put my placemat over the top and using twine, I
threaded into a large sewing needle (like one you may use for mending woolen
projects) utilising the buttonhole stitch method (or blanket stitch, which ever
you know it by) around the edges to seal the placemat together to the
cardboard. When coming back to the original stitch I tied it up and knotted
several times to ensure it all stays together.Then I worked a new knot into the stitch before and ensured the twine was double thickness with a gap of 9 stitches leave some slack in the string as this will be what you use to hang the noticeboard by. Tie off on the 9th stitch.
Ta-da new exciting wall space as decoration and practical for noticeboard things. Good to keep near a kitchen or entrance to grab that shopping list off!


Comments
Post a Comment